I was so happy to be chosen to participate in the One2OneNewtwork review of the new Rod Stewart album. Not only did I receive a free copy of the CD before its official release date set for May 7th but I am also able to share my opinion of the album and be eligible for other great prizes! The opinions you will read here have however not been influenced and are true, honest, and accurate as I see it.
I like the old Rod Stewart so I was anxious to hear the new album set to release after almost 20 years. The album contains 12 tracks, 11 of which was written and produced by Stewart. Time features tracks including:
1. She Makes Me Happy
2. Can’t Stop Me Now
3. It’s Over
4. Brighton Beach
5. Beautiful Morning
6. Live The Life
7. Finest Woman
8. Time
9. Picture In A Fram
10. Sexual Religion
11. Make Love To Me Tonight
12. Pure Love
Of the tracks on the new album some of my personal favorites are She Makes Me Happy, Can't Stop Me Now, and Time, with Time probably being my overall favorite. Time is one of those songs that can speak to everyone in some form or fashion making it a meaningful piece of exceptional music. The beat and lyrics of these songs make them easy to love and quickly sing along with. I am sure in no time these will be some of my favorite tunes to sing along to on my way to work. It's Over was another track that was also very nicely written about divorce and separation.
In addition to his new album release Stewart will also be kicking off the European leg of his Live the Life Tour on June 1st. Steve Winwood will help kick start the American dates on October 17th.
Preview Time for yourself and make your own decision how you think the sweet chords of Stewart sounds.
Or you can
preview the She Makes Me Happy video by clicking here.
If you would like a copy of the album to call your own simply click on one of the following links for quick access and a simple process.
iTunes or from Amazon
Life is Worth Living: Encounter, Experience, and Share it!
We are Forced to Play but can Navigate by Choice. ~Rhonda Meadows~
Sunday, May 5, 2013
Monday, January 7, 2013
Cute Manicure and Very Happy Hands
Migi Nail Art and Neutrogena Norwegian Formula Hand Cream
This is a simple manicure that can be really cute for Christmas or just for matching clothing in a cute style. The best news is you can get this manicure at home minus the expensive appointment! I used the primary red and white from my Migi NailArt kit to design this look. These pens are a bit of an expensive investment initially at around 25 bucks but come with lifetime replacements for $2.95 so I really can't complain.
Before you begin painting use a cuticle oil to soften the cuticle so it can be pushed back easily and without causing pain. I used some that I purchased at Sally's Beauty. Use a cuticle pusher to push the cuticle back and then if you have the cuticle trimmers trim any excess cuticle from the nail so that the nail is clear of any excess. Once the cuticles are trimmed paint the entire nail with the red polish. Allow the nails to dry completely. Once dry use the white to draw angled lines. I like the look of the slanted lines better than those that are horizontal. Allow the lines to dry completely before topping with a clear top coat. The topcoat will make the color glisten and help preserve it as well. Once everything is dried dab a small dab of Neutrogena Norwegian Hand Cream onto your hands and massage the cream into the hands and cuticles. Take care with each finger and hand to ensure that each one is allowed to absorb the moisturizing formula. Your hands and nails will look and feel exceptional and it can all be done at home, on your own time, and at your convenience.
Sunday, January 6, 2013
Castle Birthday Cake
I baked this cake for my son's 9th birthday. I had planned to put Harry Potter figurines on top because he wanted that theme but I could not find them.
I used the following materials:
2 boxes of chocolate cake mixes
2 and 1/2 boxes of white icing
black Wilton gel icing (found in the cake decorating aisle of walmart)
green Wilton gel icing
blue tube icing
green fondue
ice cream cones regular size and minis
marshmellows regular size and mini
green apple twizzlers
chocolate covered orange sticks
mini hershey bars
1-cake board
tooth picks
First bake one of the cake mixes as the box instructs. I used an air bake pan to help hold in moistness. Once the cake is baked remove it from the oven and allow it to cool completely before putting it on a cake board. If you try to get it out before it is completely cooled you may tear up the cake and have to piece it back together or worse toss the whole thing! Once the cake is out of the pan mix up and begin baking another cake. Follow the same steps as you did with the first.
While the second cake is baking begin rolling out the fondue and cut out triangle shapes for your trees. Cut two for each tree. Add a toothpick between each triangle to attach it to the cake. These can be laid aside while you icing the bottom layer. I made a yard and then began the castle on the first layer. The green yard was made from using about 1/4 of a can of white icing and mixing in the green Wilton gel. Add the gel slowly to get the shade you want. I got the grey color from mixing the white icing and the black gel food coloring. Add the black slowly or else you will end up with a black castle. I used a tooth pick to add the color and folded it in completely before adding any more. You might also consider doing a castle surrounded by water and use blue instead of the green. If you choose to do a pond make a small area of the cake blue. Once the bottom cake is completely covered with icing like you want it you can begin working with the second cake or working to make the towers you are going to need. I did both cakes before I made the towers because they are very touchy once you begin icing them. The second cake will need to be cut to make the 2nd layer of the castle. I eneded up only making 2 layers but there is enough left over to make a small top if you would like another layer. I was not sure it would look right because then the layers would be taller than the towers.
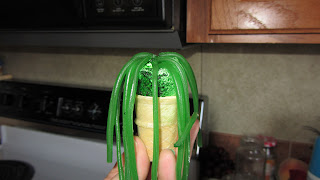
The towers are ice cream cones. The main tower is one full size ice cream cone with a marshmellow and mini cone inside it. You will need to heat the cone just a bit to get the small cone to stay in place and also so that you can straighten it before you begin coloring it with icing. I used the same color icing as I had used for the castle so that it all matched. You will need to put tooth picks gently into the bottom and sides of the cones so that you can attach them to the cake. Once in place I used icing to cement them to the cake and filled in the cracks between cake and cone. I made 2 of these one for each side but you could make more depending on how you want your castle to look. The top tower in the center of the cake is just the top ring of an ice cream cone, a mini cone, and a small flag made from the green fondue. You will feel like a mason before it is complete and wonder if you should have invested in one of the concrete spreaders at the hardware store.
The stones around the second and top layer of the castle are mini marshmellows rolled in cake icing. The doors and windows are sculpted mini Hershey bars. The bridge is made from chocolate covered orange sticks. The green apple twizzlers are tall overgrown grass by the pond and ivy crawling up the side of the castle. It was first intended to be used to make a willow tree with a mini cone and marshmellow but it was too heavy and it eventually fell apart.
Be prepared to splurge on supplies and have at least 5-6 hours on hand to complete this project. I began work on it about 10:30 AM and it was complete around 4PM, and this was because my husband had baked the first cake while I was still fast asleep!
Tuesday, December 18, 2012
A poem for the Innocent of Sandy Hooks
The Innocent Lives of Sandy Hook
Some things in life
We just can’t
understand
Raging through our
land
Many innocent lives lost
At the hands of a cowardly
fool
In a place considered
secure
A Connecticut elementary
school
The lives of teachers
and students
Was not all that was
lost that day
Many other innocent
children
Had their innocence
stripped away
Some will ask the
question
Where was God during
this
Another one may
answer
Certainly not amiss
He was not welcomed
By our system anymore
So He waited on the
other side
By heavens open door
By: Rhonda Meadows
December 18, 2012
This horrible incident, which I wished to have never had a
chance to have written, has touched not just a state or small town in
Connecticut but the entire Nation. Many search for an answer and ask the
question why, but only one man and the good Lord above can honestly answer that
question, and for those left baffled it may never be clear. Others look to
avoid such a horrific act again and in doing so they believe guns is the place
to start. Let our Nation join without forcing a wedge in the middle over gun
rights and laws, which will not solve the problem at all. If a person is
disturbed enough to commit a hideous act such as this do you really honestly
believe that a gun ban is enough to stop him? Gun bans are not the answer but
lifting one is. Lift the ban on Jesus. Expect he is needed every day and not
just during a tragic time or on Sundays. Bring Him back in our homes, schools,
and other municipals. Put His name back in our Pledge of Allegiance, on all our
money, but most importantly in all our hearts. Only through Jesus can evil be
conquered.
How such a task can be accomplished in my own words taken
from Romans
Chapter 12 verses 19:21; Do not seek revenge on those who have wronged
you for the Lord promises to repay the Vengeance for you. Rendering a
punishment for a punishment is wrong. Therefore if someone has wronged you and
found to be in need treat him kindly meeting his needs if possible, in doing so
you do not succumb to evil but instead overcome his evil with your good works. His
evil will be justified by God almighty and your heart remains pure as evil is
conquered.
Subscribe to:
Posts (Atom)